Creating a beautiful blog from scratch can seem SUPER daunting when you have zero tech experience and really just don’t know where to begin. Believe me, I used to be you, so that shows you that it can be done!
By the end of this post, you will have your blog up and running with ease. So read on!
I used to spend long hours just trying to create a WordPress blog that didn’t look like it was created at the dawn of the internet, only to preview my page to see it was a far cry from the beautiful blogs I saw that were actually doing really well.
Then, after tons of trial and error, when I finally got my blog looking the way I wanted it to look, I realized my site was loading at turtle’s speed.
How?? Whyyyy was everyone else’s page loading fast, but mine wanted to creep along? Why was everyone else able to create a gawgeous (a.k.a. supa dupa gorgeous) website, but mine was just..not it?
I often felt like I couldn’t get to the money making activities because I was constantly stuck in design mode.
I was..can you say CONFURRSED (a.k.a. supa dupa CONFUSED – I like making up words if you haven’t noticed)
So when I figured out how to actually create a beautiful site that looked good, loaded fast, attracted visitors, got email subscribers, and actually made money!!! Can you say, your girl knew she needed to pay it forward!
That’s why I decided to create this super detailed guide on how to build a WordPress blog from scratch as a COMPLETE beginner with no experience.
You, my friend, don’t have to be like I was, going through the frustrating trial and error of building site after site, designing page after page, only to realize that it just isn’t the one, days, weeks, or months down the road.
So sit back, relax, and follow along step by step as I give you these actionable instructions on how to create a WordPress site that is, beautiful, loads fast, and can actually make you money day after day, week after week, and….well you get my drift.
I’ll be using Bluehost, my hosting company of choice for many reasons that I will cover below. Use this link to get your hosting for $2.95 a month, a free domain, and a ton more.
Today I’m going to cover:
Step 1: Get Amazing Hosting, Trust Me You’ll Thank Me
Step 2: Choose a Top Quality, Money Making Niche
Step 3: Choose a Domain Name
Step 4: Know Why Starting a Blog is a Must (Doesn’t Seem Like a Step but You Have to Know the Why)
Step 5: The Step By Step How to Guide to Create Your WordPress Site TODAY
Step 6: Create High Quality Content
Step 7: Get Traffic to Your Blog
Step 1: Get Amazing Hosting, Trust Me…You’ll Thank Me
Yes I cannot stress this enough. Hosting is the first and one of the most important steps to creating and setting your blog up for future success.
I use Bluehost and strongly recommend it to have the best experience as a new blogger.
As a blogger, you are going to want your site to, among many other things, load fast. And one of the most important factors of a site that loads at lightning speed is hosting.
I didn’t realize this, and found this out the hard way after my site had already been created and launched. I ended up having to migrate my site from my old hosting company to my now hosting company (Bluehost).
After researching, I found that hosting companies have a “maximum” load speed that they can get up to with shared hosting. And Bluehost is by faaar the most bang for your buck.
It loads fast, which helps you to actually get found on Google much faster than a site with way slower load times. And more Google, means more traffic, which means more readers and more customers.
When I switched hosting companies my site speed drastically increased yay!! It was a relief, because I felt like I could move on to actually working on creating amazing content that I knew could bring in traffic.
Other amazing benefits of going with Bluehost are:
- Free Domain that you can choose later – none of my previous hosting companies did this, so this was clutch! Not only do you get a free domain, but you don’t even have to know your domain name before you get hosting. So for those of us, like myself, who have a hard time making a choice, this is great because you can completely design your site, and then circle back around and choose your domain name last.
- Super Cheap to Get Started – You can literally get started with Bluehost for the price of a plain coffee at Starbucks a month ($2.95). This is also one of the least expensive hosting companies around. I love this, because when you are first starting as a new blogger, you are not trying to spend an arm and a leg to get started. I recommend starting with the 12 month option and paying the full year up front so that you don’t have to worry about your hosting being interrupted with the month to month option. Commit to your blog for at least a year. So many amazing things can happen!
- Free SSL Certificate – Again, the other web hosting companies I used to be with charged for this feature. SSL certificates are a must have for your blog for traffic and to accept payments. With Bluehost your hosting automatically comes with the SSL certificate and you don’t even have to worry about installing or activating it.
- 1 Click WordPress Installation Option – Bluehost makes it very easy to install WordPress on your site, which I will show you below. I wish I had Bluehost to do this when I first started creating WordPress website. The learning curve would’ve been way way easier.
- Checklist of Everything You Need to Complete for Site Building – A checklist makes everything better, especially when you are not an expert at this website building thing. Actually, even when you are an expert. Bluehost gives you a checklist of everything that you should do before your site goes live. This makes building your site quick and easy because you know exactly what to do.
- Amaaaaazing Customer Support – This y’all…THIS is everything and more. Their customer support team goes above and beyond to help you and answer your questions. Whether it’s WordPress design related, or whatever, they will do all they can to help you. It’s like talking to a real human being that actually…get this….cares. You don’t ever have to feel alone with them.
- Actually Recommended by WordPress – This is 1 of only 3 web hosting companies that is recommended by WordPress and Bluehost is my favorite out of all of them.
Use this link to get all of the amazing benefits that Bluehost has to offer
Step 2: Choose a Top Quality Niche
Now before I go into this, it is important to decide your why. And be really honest with yourself.
Why do you want to start a blog?
For most of us, it’s to make money talking about something that we love.
I think blogging about what you love is powerful and gives you the opportunity to create something that you can build upon for years to come, while actually making a very positive difference in other people’s lives.
However, I want you to make money on this journey, so you will want to make sure that the passion that you are blogging about also solves people’s problems.
The key to a successful blog that makes money is to create blog posts that solve a problem for someone.
A recipe can solve the problem of a mom looking for something to cook for her family. A list post of how to fix your credit can solve the problem of someone looking to build their credit.
Choose a niche that solves people’s problems and that you are knowledgeable about (and enjoy!) and you will make money blogging.
Some examples of great niche categories are
- Finance and Money
- Mommy
- Health and Fitness
- Food
- Home Decor
- Home Organization
- Personal Development
- just to name a few!
Step 3: Choose a Domain Name
Now again, this is actually optional at this step because when you signup for Bluehost you get a free domain name, which you don’t actually have to choose until later on down the line after you have built your website.
They give you a temporary domain until your domain is ready.
This came in handy also when I transferred my site over from my old hosting company, because I didn’t want any downtime while I was copying my files over to Bluehost.
I was able to keep these files at a temporary domain, which allowed me to look at everything on the site and then later point my domain name to the new website that was built.
However, if this is your first rodeo and you don’t yet have a domain name, definitely use the free domain provided by Bluehost.
Below when we create our WordPress site, I will show you the full point and click tutorial of setting up your Bluehost account and then choosing and adding your domain.
Step 4: Know Why Starting a Blog is a Must
Starting a blog is one of the best things I have ever done!
It has given me something to build towards, a huge sense of accomplishment, and provided an extra source of income that I never would have had if I had not started my blog. And the income can and will DEFINITELY be passive if you stick to it!
But man oh man do I regret not starting my blog much sooner. If you know anything about blogging, you know that the longer your blog is around, the more traffic you get, which means the more people you reach, and the more money you have the potential to make.
If I’d started back when I first had the desire, my blog would be 10 years in instead of 2 and more than likely have a ton of traffic. But hey! You live and you learn!
I said all of that to say, if you are thinking about starting a blog, just do it. Don’t overthink it, just go for it!
Start writing one post a week and you will be so SO happy that you did.
Alright…let’s build your blog…
Step 5: The Step By Step How to Guide to Create Your WordPress Site TODAY
Ok the wait is over! Use the click by click guide below to start your WordPress blog on Bluehost
1 First things first…Head over to Bluehost and secure your hosting
Head over to Bluehost and select the button Host Your Site to move to next step and choose a plan.
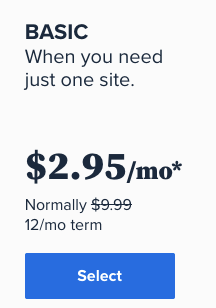
2 Next Select the Plan you are choosing to go with.
Click “Select” below the plan that you choose.
I recommend starting with the 12 month Basic option and going ahead with the full year. Month to month puts your blog at risk of being down when you begin getting visitors to your site and that is a no-no.
You get the cheaper price when you choose the full year, which comes out to be SUPER inexpensive for the year (like $30-$35).
Plus you get the free domain and other features that come with buying the year in full.
Also, if you are only focusing on one blog at the moment, then all you need is the Basic option (that’s all I have).
3 Setup your domain for your blog
You now have 1 of 3 options. You can Create a New Domain, Use a domain you own, or choose the option at the bottom “I’ll create my domain later“. We will step through what to do for each.
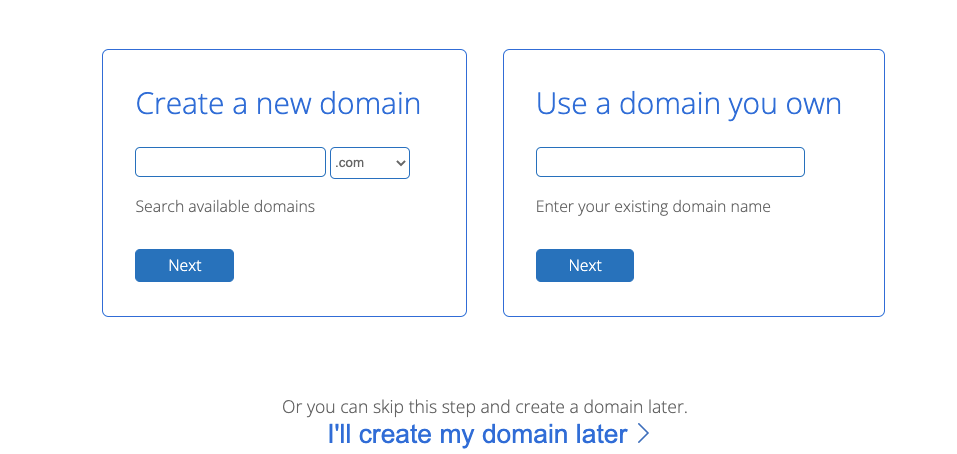
Create a New Domain
If you know what you want your domain name to be start typing it into the search bar to see if it’s available and select ‘Next’. If it is, you can move to the next step.
If not, think of variations to your domain name that you could use. Bluehost is amazing and will also give suggestions for other names if your name isn’t available. Maybe make it plural, or consider adding another short word to it.
*Pro Tip: Try not to make your domain over 16 characters. You want it to be easy for people to remember. If you do make it a catchy phrase that rolls off the tongue.
Use a Domain You Own
Here you just type in your domain that you already own. For example mydomain.com and then select Next.
After your account is setup, you will then go to where you purchased the domain and put the nameserver in for Bluehost. It sounds complicated but it’s really simple.
If you purchase at namecheap.com you can simply type in Google “How to change nameservers in namecheap” and you will get some super simple directions. It takes at most 5 mins to change. Type this in the search for wherever you purchased your domain, i.e. “How to change nameservers in GoDaddy”
Create your domain later
This is an amazing feature of Bluehost which also makes it beginner friendly. If you don’t yet know what you want your domain to be, but you want to go ahead and create your blog, select this option.
When you select this option, you can proceed right to the next step and enter your account information. Come back to create your domain later when you know what you want it to be.
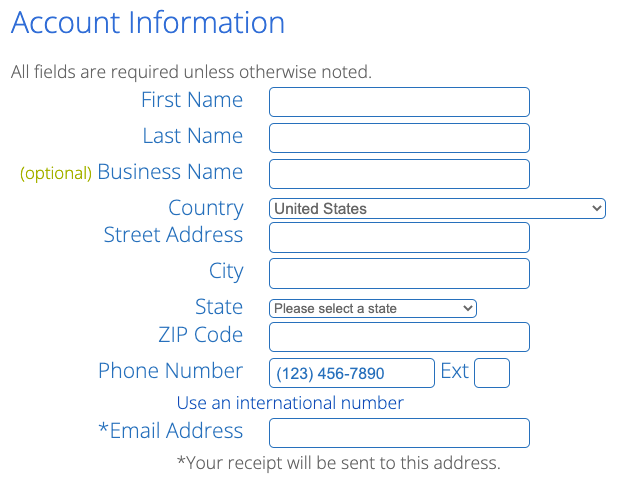
4 Enter Your Account Info
Enter your account information. You don’t have to enter a Business Name. None of this information will be shown on your site. It’s only for setting up account ownership.
5 Select and Buy Your Hosting Package
- Choose the 12 month plan instead of doing month to month for a bunch of reasons – Cheaper pricing than month to month, no risk of hosting going down because you haven’t paid this month & you get a free domain.
- Don’t choose any package extras – If you need to later you can always do so, but just not necessary at the moment.
- On the next screen select the button “Create Your Account” to enter your password and account information and then select “Create Account”.
You can then move on to the fun stuff! The WordPress installation YAY!!
6 Install WordPress with your Click by Click Installation
Let’s create your site!
- Follow the prompts to Login and then select “Create Your Website”.
- When you get to the next page select the middle step “A Little Help”. Bluehost will then guide you through every step to setup your blog. It’s literally a few questions and and your WordPress site is up and running.
- Pick a Theme – The Bluehost setup will also guide you through picking a theme for your site, free or Premium – I recommend starting with a free theme, and then once your site is built, you can circle back around and get a paid theme.
My favorite themes are below:
Free WordPress Theme
Customizr is one of the best free themes I have found.
Best Paid WordPress Theme
Divi is what I use and absolutely LOVE. It’s extremely easy to use.
In the long run, Divi is definitely the best option because you can create a super gorgeous site that can grow with you as your blog grows. But I always like to initially do what works and is good enough and then circle back around for something more perfect.
I say that because it’s better to have a site that’s just good with a lot of articles that make you money, than a beautiful site with no content.
Step 6: Create High Quality Content
Creating high quality content is the cornerstone for your blog. Circling back around to content that solves people’s problems.
Gone are the days where you could write an update on your life, or what you had for breakfast this morning, and have people flocking to your site.
That’s just not what the world is concerned about on your blog. People read blogs to get an answer to their questions, so you should always be thinking “How can I help my reader. What problem can I solve?”.
Follow these steps to find high quality posts to write about on your blog:
- Identify who your target audience is that you want to help. Don’t stress about this, you can always change it later.
- Brainstorm a list of 20 keyword phrases that are your reader’s problems (i.e. How to get rid of belly fat, How to cook vegan lasagna, How to create a bullet journal)
- Type each of these keyword phrases into Google or Pinterest and see what’s ranking. The articles that come up in search are the articles you want to mirror (i.e. 7 Things to Add to Your Bullet Journal, 10 Ways to Lose Belly Fat Fast, How to Meal Prep in Under 30 Minutes)
- Week 1: Choose 1 of the keyword phrases and write your blog. Do the same thing every week until you have a least 10 blog articles on your site (you can do as many articles as you want. There is no limit of time you have to wait to post. Once you have posted 10 articles, move to the next step)
If you haven’t started your blog yet, get started for only 2.95 a month and get a free domain.
Step 7: Get Traffic to Your Blog
You have the articles up, they are awesome, now what?
Crickets…
Yep that’s typically how it works. We are all nervous about getting our blog up and running, and afraid of who might read our articles before they’re ready, and then you post and no one comes…
Blogging isn’t how it used to be where you can post an article and people just find you by happenstance. Nope you now have to go out and find the people that are looking for the answer to the problems your articles are solving.
I recommend 3 ways to do this:
- Pinterest – this is how I began getting great traffic to my blog without having to wait for Google to find me. It’s how I first began building my email list, and I love this option to start getting quick wins and traffic to your site in the early months. My friend Carly has a fantastic deep dive that shows you exactly how she created a new niche site and built the traffic to 60,000 pageviews a month in less than a year. It is so worth it, and I guarantee you it’s a technique that you have never heard of before on Pinterest. She teaches you how to use Pinterest today, which is completely different than how Pinterest used to be.
- Google – Good ol’ organic Google traffic. Don’t you love it? I DO! Now I must admit that getting traffic from Google organically is a slow and long term game, and a topic for another day. But I’m here to tell you that mastering SEO is a complete game-changer for your business. I will be posting more about this topic in the future, so stay tuned!
- Ads – Now this isn’t really a subject that I have heard talked about much on other blogs, but ads can be a very effective way to bring an audience to your site and make money with your articles. However, it’s only wise to run ads to your blog if you have monetized the blog that you are running ads to. Meaning you have added affiliate links or links to a product that you sell. Affiliate links are super duper powerful when you use this strategy. Michelle created this must-get-for-every-new-blogger affiliate course that is absolute GOLD. It teaches you all about monetizing your posts, and driving traffic both organically and with paid ads. She has made over $1,000,000 using affiliate marketing and consistently makes $40k every month on just one post alone.
Choose one of these traffic methods and go all in! You can do it. You will create the type of blog that you desire, and make great money doing it. I believe in you!
In Conclusion
Bluehost is the best option for hosting for beginners. To create your blog today go to Bluehost and select the Host Your Site button.
I use it and love it, and they will help you to build a beautiful and simple WordPress blog with the least amount of effort and the least amount of money.
A free blog (like on blogspot) is just not an option if you really want to make money with your site. You don’t own your blog and to really be taken seriously as a blogger, you need your own domain.
Also, while you are getting your site up and running, my advice is don’t take forever designing your site. What matters the absolute most is your blog posts and getting the content out there.
Post at least one article every week, and use Pinterest, Google, or Ads to get traffic to your site. This amazing course can change the game for you and show you have to make real money on each article you post.
Follow these steps consistently and watch your site blossom into this beautiful money making machine!
Stay tuned for my future posts because I will be going in depth about how to make great money from your blog. Until next time!